Monday, December 13, 2010

Pumpkin Bundt Cake


When my friend first sent me this recipe, I started drooling. This bundt cake screamed to be made. I could almost taste the pumpkin cake from my laptop screen. So, what else could I do but make it?

The directions are pretty simple, and it uses ingredients that you can find around your house, minus the pumpkin puree. And unlike many other bundt cakes, this one only uses a stick of butter. Phew! See? A cake can be good with less butter! The cake was moist, fluffy, and had a good balance of pumpkin flavor. The cream cheese icing was a good complement to the spice of the cake, although I had to adapt it a little because I didn't have any milk on hand. So instead, I used water. Other than that, just follow the directions to the T and you should have no problems.
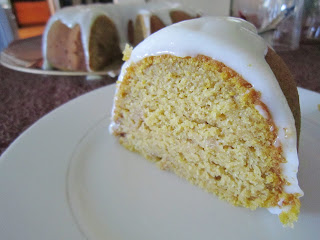


close-up shot.


Pumpkin Bundt Cake by Baking Bites:
2 3/4 cups all purpose flour
2 tsp baking powder
1/2 tsp baking soda
1/2 tsp salt
2 tsp pumpkin pie spice
1/2 cup butter, room temperature
1 cup sugar
1/2 brown sugar
3 large eggs
2 tsp vanilla extract
1/2 cup vegetable oil
1/2 cup buttermilk
1 1/4 cups pumpkin puree

Preheat oven to 350F. Lightly grease and flour a 10-inch bundt pan.
In a medium bowl, whisk together flour, baking powder, baking soda, salt and pumpkin pie spice.
In a large bowl, cream together butter and sugars until light and fluffy. Beat in eggs, one at a time, followed by the vegetable oil and vanilla extract.
Whisk together buttermilk and pumpkin puree in a small bowl or measuring cup.
Stir about 1/3 of the flour mixture into the butter mixture, followed by half of the pumpkin mix. Stir in another 1/3 of the flour mixture, followed by the remaining pumpkin and the remaining flour. Mix only until ingredients are just combined and no streaks of dry ingredients remain visible. Pour into prepared pan.
Bake for about 45 min, or until a toothpick inserted into the center of the cake comes out clean and the top springs back when lightly touched.
Cool in the pan for 10 minutes, then turn out onto a wire rack to cool completely.

Makes 1 bundt cake; serves 10-12

Vanilla Cream Cheese Glaze
2 oz cream cheese, room temperature
2 tbsp milk
1/2 cup confectioners’ sugar
1 tsp vanilla extract

In a small bowl, beat all ingredients together until very smooth. Drizzle over cooled cake.

Tuesday, November 9, 2010

Pumpkin Bread with Chocolate Chips


It finally feels like fall, doesn't it? There's a little chill in the morning that makes me want to drive to the nearest Coffee Bean and order a hot cup of coffee. The trees in my neighborhood are starting to turn orange and the air smells crisp. And so begins the month of reflecting on life's blessings.

Anyways, onward to the goods! There is no better way to welcome fall than to bake something with pumpkin in it. Am I right, or am I right? This pumpkin loaf is moist, pumpkin-y, and pretty good if I do say so myself. I added chocolate chips to the batter because, as you know, chocolate makes everything better...and I do mean EVERYTHING.

The recipe is from food.com:

Ingredients:

Yield: 2 loaves

Directions:

Prep Time: 10 mins

Total Time: 1 1/4 hr

  1. Preheat oven to 350 degrees and grease 2 loaf pans.
  2. Mix together well the pumpkin, sugar, oil and eggs.
  3. Add flour, baking powder, baking soda, cinnamon, ginger and raisins, and mix well.
  4. Pour into loaf pans and bake for 60-65 minutes or until inserted knife comes out clean.

Monday, October 25, 2010

A Friend's Farewell


A good friend of mine left for the army yesterday. For the farewell party, I wanted to do something a little special. Originally, I wanted to make a cake, but after looking at ideas, I decided to do a thin mint cupcake. Being short on time, I did what most bakers would call "appalling". I used a box cake. guilty. Basically, I bought some box cakes and added peppermint extract to the batter. How much extract? Oh, I eyeballed maybe 2 teaspoons or so. Add about 2 teaspoons of extract to the frosting as well. If you like a strong flavor, feel free to add more extract.


I also made some red velvet cake pops with 2 different flavored "frostings". One was the normal green candy melt, the other was semi-sweet chocolate. I think I prefer the green candy melt. The recipe is the same as my previous post with cake pops.


Sometimes the cake pops crack on the outside. Remedy: Decorate with chocolate!


Lastly, my friend asked me to make him a pie, but instead of making 1 big pie, I decided to make apple pie empanadas so it's easier to serve and eat. I adapted Emeril's apple pie turnover recipe here. I bought some pie crusts from the market (can you tell how lazy I was today?) and made the filling. 400F for 19 minutes turned out to be a pretty good estimate for these guys.


All in all, it was a pretty successful baking day!

Wednesday, September 29, 2010

Tall Lemon Cheesecake with Fresh Raspberry Sauce


I love cheesecake. It may be one of my favorite desserts along with creme brulee and chocolate cake. The cold, creamy texture of the cheesecake mixed with the buttery crust makes for one delicious comfort food.

The other day, I saw a pound of raspberries on sale for $1.60 at the market! $1.60!!! Somebody must've made a mistake and wrote the wrong price, but who am I to point that out? With 2 lemons and an abundance of raspberries, I could think of no other thing to bake besides cheesecake.

I wanted to make sure that this cheesecake turned out perfectly, so I did my research and found the best recipe for a tall and creamy style cheesecake. In order to make it a little lemony, I added the zest of 2 lemons, and the juice of 1. The final product had a light lemony flavor -- perfectly refreshing in this odd California heatwave. The raspberry sauce is Emeril's recipe, which you can find on the food network. You can find the cheesecake recipe here.

You start with 4 blocks of cheesecake (8oz blocks). It sounds like a lot, but you need four to make a nice, tall cheesecake.


The recipe calls for 1 1/3 cup of heavy cream or sour cream, so I did 1/2 heavy cream, 1/2 sour cream to make the 1 1/3 cup.


Don't forget to zest the lemon before you start the whole process. Isn't my lemon zester just the cutest thing ever?


Mix all the ingredients until it's smooth and creamy.


Follow the directions to make the crust. I didn't quite have the amount of crumbs required of this recipe, so my crust wasn't as thick.


Pour the creamy mixture onto the baked crust and bake for a long time in a water bath.


Here's the final product...


Bon appetit!

Monday, September 13, 2010

Green Tea and Chocolate Macarons


For my friend's birthday, her boyfriend secretly asked me if I could bake something for the bonfire. I excitedly agreed and we talked about what she would love to eat. The result - macarons and anything blueberry. I made the lemon blueberry crumble bars because she had never tried them before, and green tea and chocolate macarons. Friday was definitely a failure as I had forgotten to put the sugar into the crumble bars, and I ran out of almond flour and couldn't make enough macarons for 15 people. Thankfully, I had most of Saturday to go out and get the rest of the ingredients.

They turned out better than I could've asked, which was great because it was for a dear friend! I made 4 kinds using 2 flavors: Chocolate with chocolate cream, Green tea with green tea cream, Chocolate with green tea cream, and Green tea with chocolate cream. Did you get all that??


I basically used the same recipe for both, but substituted green tea powder where the chocolate powder would normally go. It turned out to be fine. I always get nervous when putting the macarons into the oven to bake. Why? Because one mistake during the process will result in flat or failed macarons. But 13 minutes later, I peered in and saw that they were going to be just fine.

We have "feet"!


From front to back: Choco + green tea, choco + choco, green tea + green tea, green tea + choco


Chocolate and Green Tea Macarons adapted from Annie's Eats
Ingredients:
For the macarons:
110 gm almond flour
200 gm minus 2 tbsp. confectioners' sugar
2 tbsp. cocoa powder OR green tea powder
100 gm egg whites (from about 3 eggs), room temperature
50 gm granulated sugar

For the espresso ganache:
9 ounces bittersweet chocolate, chopped
1 cup heavy cream


For the green tea buttercream:
1½ stick of butter
1 tbsp. green tea powder
2 tbsp. milk
2 cups of powdered sugar

Directions:
Sift the almond flour, powdered sugar, and cocoa in a bowl. Set aside.  In the bowl of a stand mixer fitted with the whisk attachment, whip the egg whites on medium-high speed until foamy. Gradually add the granulated sugar and continue beating until a smooth, shiny meringue with stiff peaks forms. Add the ground almond mixture to the bowl with the meringue and quickly but gently fold together using a wide rubber spatula until no streaks remain. You want to achieve a thick batter that ribbons or flows from the spatula when lifted.

Line two baking sheets with silicone baking mats. Transfer the batter to a piping bag fitted with a plain wide round tip. Pipe into small rounds on the prepared baking sheets (each round should be about 1-1½ inches in diameter), spaced about 1 inch apart. Let sit at room temperature for about 30-60 minutes to develop a hard shell.

Preheat the oven to 325˚F. Bake for 10-12 minutes, depending on size and your oven. Transfer the pans to a wire cooling rack and let cool completely before moving the cookies.

While the cookies are cooling, make the ganache or buttercream:

CHOCOLATE GANACHE

1.Place the chocolate into a medium bowl. Heat the cream in a small sauce pan over medium heat. Bring just to a boil, watching very carefully because if it boils for a few seconds, it will boil out of the pot. When the cream has come to a boil, pour over the chopped chocolate, and whisk until smooth. 
2.Allow the ganache to cool and thicken before filling each macaron shell. 

GREEN TEA BUTTERCREAM
1. Cream the butter, green tea powder, and milk together until smooth.
2. Add one cup of powdered sugar at a time until you reach the desired sweetness and consistency.

Once the cookies are totally cooled, match them up by size. Pipe a layer of ganache/buttercream onto the flat side of one cookie of each pair. Sandwich together with the remaining cookie, pushing the filling to the edges.

Thursday, September 2, 2010

Red Velvet Cookies


It's almost Labor Day weekend and for every patriotic holiday we have, some random person goes around my neighborhood and places little American flags on every person's lawn. It's nice of them to do that. As I was looking at that flag flying in the wind, a light bulb went off in my head -- bake something "American". Little red velvet star-shaped shortbread cookies. The name is a mouthful, but the cookie is wonderful. Whoever decided that shortbread and red velvet go well together is my hero.

Using a small dollar-coin size star cutter, I made approximately 50 cookies. These little guys are great because they aren't as sweet, but have a hint of cocoa in them. And because of their small size, I don't feel as guilty eating 3 or 4. I left out the white chocolate just because I didn't have any on hand and didn't feel like going out to the market. I do think they would taste good with it though, so next time I have white chocolate, I will definitely use it! Enjoy~

Here's the recipe from Better Homes and Garden:

Ingredients

  • 1-1/4 cups all-purpose flour
  • 1/3 cup sugar
  • 2 tablespoons unsweetened cocoa powder
  • 1/4 teaspoon salt
  • 1/2 cup butter, cut up
  • 1 tablespoon red food coloring
  • 3 ounces white chocolate (with cocoa butter), coarsely chopped
  • 1-1/2 teaspoons shortening
  • Finely chopped pistachios or rainbow nonpareils (optional)

Directions

1. Preheat oven to 325 degrees F. In a food processor, combine flour, sugar, cocoa powder, and salt. Cover and process with on/off turns until combined. Add butter and red food coloring. Process with on/off turns until mixture resembles fine crumbs. Process until mixture just forms a ball.*

2. On a lightly floured surface, knead dough lightly until nearly smooth. Roll or pat dough to a 1/2-inch thickness. Using a floured 1-1/2-inch round cutter, cut out dough. Place cutouts 1 inch apart on an ungreased cookie sheet. Press scraps together and reroll.

3. Bake in the preheated oven for 20 to 25 minutes or until centers are set. Transfer cookies to a wire rack; let cool.

4. In a heavy small saucepan, melt white chocolate and shortening over low heat, stirring constantly. Dip half of each cookie into melted chocolate. If desired, sprinkle with pistachios or nonpareils. Let stand on waxed paper until set. Makes about 24 cookies.

*Hand-mixing method: In a medium bowl, stir together flour, sugar, cocoa powder, and salt. Using a pastry blender, cut in butter and food coloring until mixture resembles fine crumbs and starts to cling together (it will take a while for the dough to come together). Form mixture into a ball, kneading until smooth.

To Store: Place cookies in a single layer in an airtight container; cover. Store at room temperature for up to 3 days or freeze for up to 3 months.

Monday, August 23, 2010

Cake Pops in Green and Blue


I have been waiting to make these little suckers (get it??) for a long time, but never had a special occasion to make them until the other day. Cake pops are ingenious. If you're like me, then a slice of cake can sometimes make you feel so guilty about eating the whole thing. So what does someone invent? A little bite-sized piece of cake that tastes good and looks good too. You won't feel bad about eating one of these because they're so small.

Thanks Jamie for being my hand model. :)


I have to admit, my first batch of cake turned into a disaster when my friend and I added too much frosting to the cake. I originally wanted to make red velvet and strawberry cake pops, but the strawberry frosting was a little too creamy for the cake resulting in a mushy mess. We had to toss the wonderful strawberry cake, but the lesson was learned -- add only half the frosting at first until you're absolutely positive that you need more. Luckily, I had a box of chocolate cake lying around so I replaced the strawberry with chocolate.

These cake pops are surprisingly easy to make, albeit very VERY time consuming. Thank goodness my friend, Jamie, decided to come over, otherwise, I would've been baking away and assembling these little guys for a LONG time. All together, 50-some cake pops took the two of us about 3-4 hours to make! Imagine if I ventured into this project alone!

Here is what you need as adapted from The Hungry Housewife:
1 Box red velvet cake mix (or chocolate cake mix)
1 can cream cheese frosting (or chocolate frosting)
50 lollipop sticks
Candy melts of your choice

Directions:
  1. Bake a cake per the box directions
  2. Let cool completely
  3. Crumble cake or use a fork to scrape the cake. (Avoid the hard sides of the cake)
  4. Transfer crumbled cake to a large bowl.
  5. Put a can of cream cheese frosting into the crumbled cake and mix until completely combined.
  6. Roll cake mixture into balls the size of about a quarter and place on a cookie sheet lined with parchment or other non stick surface.
  7. Melt your chocolate per package directions
  8. Dip one end of your lollipop stick into the candy melts (works as a glue) and then place the end into the cake ball about half way. (Look at picture below)
  9. Place them in the freezer to they get nice and firm.
  10. One they are nice and hard you can dip them in the melted chocolate.
  11. Place them in a block of Styrofoam and decorate them with whatever you have on hand like sprinkles.
  12. Place them in the fridge covered or you can keep them at room temp for a couple of days if covered.
Putting the sticks into the cake pops using the "glue" of the candy melts.


Final product!

Saturday, August 21, 2010

Chocolate Raspberry Loaf


A good friend came over today for a baking party. I love baking parties. There's nothing like baking something yummy and sharing it with a friend. Too bad I'm still on my diet and was only able to eat a bite-sized piece of this absolutely delicious chocolate raspberry loaf. Is there anything better than the combination of chocolate and raspberry? I think I may like it more than chocolate and strawberry. On a side note, whoever thought chocolate and orange would go well together must've been out of their mind.

Anyways, I found a wonderful recipe online, and we tweaked it so that it was a little diet-friendly. This loaf smelled absolutely wonderful out of the oven! The fresh raspberries really up this chocolate loaf. I think next time, I will double the recipe so that the loaf is bigger and add raspberry extract to the batter as well. It seems like the extract will enhance the aroma of raspberries even more. The result was a light, delicious, raspberry, chocolate loaf, not too sweet either which is a bonus to any Asian palate. Today's baking party = Success!


Recipe taken from this blog:

1 cup cake flour
1/2 cup cocoa powder (use a high quality one)
1/2 tsp baking powder
1/4 tsp baking soda
pinch of salt
1/2 cup raspberry puree, strained
Vanilla extract
1 stick and 1/4 butter, softened, at room temperature
1 cup sugar (Used splenda)
3 large eggs

1. Preheat your oven to 350F.
2. Sift the flour, cocoa powder, baking powder and baking soda.
Combine the raspberry puree with the extract and set aside.
3. Beat the softened butter with the sugar until light and fluffy.
4. Beat the 3 eggs together in a small pitcher. Drizzle them into the softened butter & sugar mixture slowly, all the while beating the ingredients together.
5. After the mixture has come together (it must be smooth), add in 1/3 of the dry ingredients. Fold this in gently.
6. Fold in half of the raspberry puree mixture.
7. Fold in the remaining half of the dry ingredients, followed by the rest of the raspberry puree.
8. Finish off with the last third of the dry ingredients.
9. Bake this in a loaf tin (or any other tin you desire...) until a skewer inserted in the middle comes out clean.
10. Consume the warm cake with joy in your hearts, and your house will smell like heaven.

Healthy Brownies for a Healthy Lifestyle


Are you on a diet? I am. Having friends who want every food that they can't have when they go off to school is cause for a few extra pounds on the scale. For a couple weeks, I willingly and enjoyably tagged along to all these yummy eateries with friends who needed their "last hurrah" before leaving. It was a happy time. However, when they left, all that was left of their presence was my double chin. Yum~ So I've decided to go on a diet in the meantime to shed all those fish and shrimp tacos, carne asada fries, sushi rolls, sandwiches, and countless amounts of desserts.

BUT I'M A BAKER AND CHOCOLATE ADDICT! The diet wasn't too bad to begin with, but my chocolate craving started creeping up on me into the 4th day. I frantically looked all over the internet for something that I could enjoy. The result: these healthy brownies made with NO flour or butter. Let me tell you right off the bat, these are not going to taste like normal brownies -- those chewy, dense, full-fat chunks of chocolate and butter. No, this recipe is for those who don't want to break your diet, but can't resist a little chocolate pleasure. This is the recipe for you.

Traditionally, brownies are made with flour, sugar, eggs, butter, and cocoa. I took the same concept, but exchanged the flour for almond meal, sugar for splenda, and butter for oil. Yeah, it doesn't sound like the brownies would taste very good, but remember?? We're on a diet.

almond meal


ghirardelli's cocoa


Don't get me wrong, I think the brownies taste good. The final product came out not as dense, a little nuttier flavored, and not as sweet. I would make this again in the future in order to save a few pounds.

Here's the recipe for the healthiest brownie you will ever try. If you want to try this recipe in its normal form, I heard it produces pretty good brownies.


Cocoa Brownies
Ingredients
1/2 cup oil (I used vegetable oil)
1-1/4 cup white sugar (Used Splenda)
2 eggs
1 teaspoon vanilla extract
1/3 cup unsweetened cocoa powder
1/2 cup all-purpose flour (used almond meal)
1/4 teaspoon salt
1/4 teaspoon baking powder

Directions
Preheat oven to 350 degrees. Lightly grease and flour 8-inch square pan.

In a large saucepan, melt 1/2 cup butter. Remove from heat, and stir in sugar, eggs, and 1 teaspoon vanilla. Gently stir in 1/3 cup cocoa, 1/2 cup flour, salt, and baking powder. Spread batter into prepared pan.

Bake in preheated oven for 25 to 30 minutes.

Enjoy!

Tuesday, August 17, 2010

Chocolate Espresso Macarons


For a long time now, I have passively perused through a countless amount of recipes for macarons - not to be confused with coconut macaroons. I have only read how difficult they are to make and how temperamental they could be. Not only did I read about its difficulty, but I also read about a ridiculous number of failures. In short, I was a little nervous about making these little desserts.

But everyone's gotta get over their fears someday, right? Right. On top of that, I purchased my first scale for baking. Now, all the recipes that call for measurements by weight, I have no problem going for it! So off I went to Trader Joes to buy all the necessary ingredients.

Call it beginner's luck, but my first time was quite enjoyable and, more importantly, successful!

Here are the egg whites ready to be whisked into soft peaks.


Combining the sugar, almond flour, and cocoa.


This was the tricky part, folding the whites into the dry ingredients until it looks something like "magma".


And the little shells right out of the oven. Look! Little feet!


Final product - dark chocolate shells with chocolate espresso ganache filling.


Chocolate Macarons adapted from Annie's Eats
Ingredients:
For the macarons:
110 gm almond flour
200 gm minus 2 tbsp. confectioners' sugar
2 tbsp. cocoa powder
100 gm egg whites (from about 3 eggs), room temperature
50 gm granulated sugar

For the espresso ganache:
½ cup heavy cream
1 tbsp. unsalted butter
1 tbsp. granulated sugar
4 tbsp. bittersweet chocolate, finely chopped
1½ tsp. espresso powder

Directions:
Sift the almond flour, powdered sugar, and cocoa in a bowl. Set aside.  In the bowl of a stand mixer fitted with the whisk attachment, whip the egg whites on medium-high speed until foamy. Gradually add the granulated sugar and continue beating until a smooth, shiny meringue with stiff peaks forms. Add the ground almond mixture to the bowl with the meringue and quickly but gently fold together using a wide rubber spatula until no streaks remain. You want to achieve a thick batter that ribbons or flows from the spatula when lifted.

Line two baking sheets with silicone baking mats. Transfer the batter to a piping bag fitted with a plain wide round tip. Pipe into small rounds on the prepared baking sheets (each round should be about 1-1½ inches in diameter), spaced about 1 inch apart. Let sit at room temperature for about 30-60 minutes to develop a hard shell.

Preheat the oven to 325˚F. Bake for 10-12 minutes, depending on size and your oven. Transfer the pans to a wire cooling rack and let cool completely before moving the cookies.

While the cookies are cooling, make the ganache. Combine the cream, butter and sugar in a small saucepan over medium-high heat. Place the chopped chocolate in a small heatproof bowl. Bring the cream mixture to a simmer, remove from the heat and pour over the chocolate. Let stand 2 minutes, then whisk gently in small circular motions until the ganache forms. Blend in the espresso powder. Let the mixture cool until it is thick enough to pipe. (To speed chilling, transfer the bowl to the freezer or refrigerator and let cool, stirring every 10 minutes, until thickened.)

Once the cookies are totally cooled, match them up by size. Pipe a layer of ganache onto the flat side of one cookie of each pair. Sandwich together with the remaining cookie, pushing the filling to the edges. Store in an airtight container.

Thursday, August 5, 2010

Bruschetta


Do you know what it means when summer comes around? I do -- tomato season. It is the best time to buy tomatoes because it's their season to shine. Now, if you live in America, you probably didn't know that because markets here carry them year-round. Strange, huh? Makes you wonder where those tomatoes come from in December.

To be honest, I'm actually not a tomato-y person. Yeah, I'll say it...I dislike raw tomatoes. The only way you can get me to enjoy them in that state is when it is part of a salsa or in bruschetta. So there I was, standing at the market, looking at all the bright looking tomatoes -- Red ones, orange ones, and yellow ones. They actually looked really yummy, so I bought some.


The best way to make bruschetta is to toast the bread, rub garlic on it (gently, and not too much because the spice of the garlic will really kick in), and top it with the tomato mixture.


To make the topping, I cut up 1 tomato of each color, added 2 small cloves of garlic, a couple leaves of basil, and salt and pepper to season. And I tend to not use those meager baguettes, but the hearty french bread, just so you can put more on each piece of bread. Voila! Bruschetta!

Monday, July 26, 2010

Grean Tea Loaf


Since coming back, I've been craving simple eats. Result: Green Tea Loaf. It's a simple loaf, clean, earthy, and tasty. Can't forget the most important part -- it's GREEN!

Adding green tea to the flour.


Soft peaks...


Smoothing the top before going into the oven...


Recipe from the Green Tea Co:

ingredients

2 cups bleached all-purpose four
2 tablespoons Matcha green tea
2 teaspoons baking powder
2 sticks soft unsalted butter
2 cups confectioners' sugar
5 large eggs, separated
Pinch of salt


directions

1. Butter a 9 x 5 x 3-inch loaf pan and line with buttered parchment or wax paper—cut to fit. Set a rack in the middle level of the oven and preheat to 325F. Combine the flour, green tea and baking powder and stir well to mix.
2. Cream butter and confectioners sugar in bowl of mixer with paddle attachment and beat for about 3 minutes or until light. Beat in the egg yolks one at a time, beating well after each addition and scraping bowl and beater occasionally with a rubber spatula. Remove the bowl from the mixer and fold in the flour mixture by hand, with a rubber spatula.
3. Pour the egg whites and salt into a clean, dry mixer bowl. Place on mixer with whisk attachment and whip whites on medium speed until white and opaque and just beginning to hold their shape. Increase speed slightly and continue whipping egg whites until they hold a soft peak.
4. Remove bowl from mixer and quickly scrape whites from bowl onto batter in other bowl. Use a large rubber spatula to fold the egg whites into the batter, folding just until no streaks of white remain.
5. Scrape the batter into prepared pans and smooth the top. Bake the cakes for about 45 minutes (35-40 minutes for mini loaf pans) or until it is well risen and a toothpick inserted in the center emerges dry. Cool the cakes in the pans on a rack for 10 minutes, then un-mold and cool it completely.