Wednesday, June 23, 2010

Last of the Apples


After this post, I refuse to do anything with apples for awhile. It's not that I hate apples, but I'm starting to get sick of trying to find different ways to use all the apples I bought. So here's the last of the bunch. I decided to make 3 mini-apple pies to commemorate Father's Day. Luckily, my whole family loves apple pie! The filling is a little sketchy in terms of the ingredient measurements, but I'll do my best to make it accurate.


Ingredients
1 refrigerated pie crust
1 gala apple cut into 1/4" cubes
1/4 cup cornstarch
2 tablespoons whole wheat flour
4 dashes of ground cinnamon
2 dashes of ground nutmeg
1 tablespoon cold butter

Preheat the oven to 350F.
1. Peel and core the apple and cut up into 1/4" cubes.
2. In a separate bowl, combine cornstarch, flour, cinnamon, and nutmeg.
3. Add apples to bowl and mix to combine.
4. Unroll the chilled pie crust and use a cupcake pan to measure out 3 round pie crusts. Make sure you make the pie crust a little bit bigger than the actually size of the cupcake hole.
5. Gently press the crust into pan so the the edges of the crust
6. Fill each individual pie crust with the apple mixture 'til about 1/4" above the surface. Dot the top of the pie with butter.
7. Use the rest of the leftover dough to create a lattice top. Brush egg white on top for a shiny surface.
8. Bake until the tops of the pies are golden brown and apples are tender, about 30 min.

Friday, June 18, 2010

Apples Galore #2


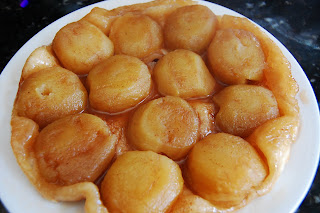
On to my second dessert using my MINI-Granny smith apples. When I first watched Julie & Julia, there were 3 things that caught my attention: the bruschetta, the boeuf bourguignon, and the apple tarte tatin.

I thought that the little mini apples would be the perfect size to decorate my apple tarte tatin, and they were! These apples seem like they were born to be part of this tart. I forget how many apples I used, but I guess you can count them in the picture.


I don't own an oven-proof skillet so I had to improvise this recipe. I first cooked the sugar, water, and butter in a skillet. Here's what they mean when the recipe calls for a "rich golden color":


Then I transferred the apples to a cake pan and drizzled the syrupy goodness all over...


Final product:


Apple Tarte Tatin adapted from this website:

Ingredients:

  • 6 to 8 large firm, sweet apples (such as Northern Spy, Winesap, Granny Smith, Golden Delicious or Mutsu), peeled and halved
  • 1 to 2 lemons, halved
  • 1 1/4 cups sugar
  • 1/2 cup water
  • 1/2 pound homemade or store-bought puff pastry (I used a pie crust)
  • 6 tablespoons unsalted butter

Directions:

  1. Preheat oven to 400 degrees F. Core apples using a melon baller to retain the rounded shape of the apples. Rub the cut surfaces of the apples with the juice from the lemons to prevent browning. Set aside.
  2. In a 10-inch cast-iron or heavy metal skillet over medium heat, heat the sugar and water. Cook the mixture until it turns a rich golden color, swirling the pan occasionally, about 6 to 7 minutes.
  3. On a lightly floured surface, roll the puff pastry in one direction into a circle that measures about 14 inches in diameter and 1/8-inch thick. Brush off any excess flour with a pastry brush.
  4. Add the butter to the skillet. Once the butter is melted, add as many apple slices as possible to the skillet, positioning them so that the rounded sides face down. Remove the skillet from the heat and top the apple slices with the puff pastry. Fold the edges of the pastry under and crimp them slightly. Make two to three small cuts in the puff pastry to allow the steam to escape. Place the tart in the oven to bake for 10 minutes. Reduce the heat to 375 degrees F and bake until the pastry turns golden brown, about 20 to 25 minutes.
  5. Remove the tart from the oven and let cool for 2 minutes. Gently loosen the edges with a knife. Carefully place a plate over the skillet and flip, inverting the Tarte Tartin. Serve warm or at room temperature.

Apples Galore #1

I'm such a sucker for anything in miniature. I went to the market yesterday to buy some chicken and veggies, what I came out with were 12 MINI-Granny smith apples. What?? There is such a thing?! You betcha. They were honestly THE CUTEST THINGS EVER! Take a look...


Here's a normal Gala and my little granny side by side:


Can it be any cuter?? Alright, enough gushing. On to my dessert! Since I unnecessarily bought so many apples, I decided to make 2 desserts. One was inspired by the apple tarte tatin I saw on Julie & Julia, and the other was something I have always wanted to try, apple crisp.

For the apple crisp, I adapted it to make it as healthy as possible. I substituted the all-purpose flour for whole wheat flour and the white sugar for splenda with a tablespoon of brown sugar. The apple crisp came out OK, although it definitely tasted better the second day. Hm. In addition, this apple crisp should only be eaten hot. I don't know how anyone could ever want it or like it cold.

Here are the little apples cut up.


The crumble on top...


The final product before going into the oven.


Apple crisp recipe found on Gourmet Gal:

FILLING
6 cups sliced, peeled apples
1 tsp. cinnamon (I used a LOT more, like 2 tablespoons)
1 tbsp. water
1 tsp. lemon juice


TOPPING
1 cup rolled oats (I used Quaker 1 Minute Instant)
3/4 cup All Purpose flour (I used whole wheat flour)
3/4 cup packed brown sugar (I used Splenda)
1/2 cup butter (you could use margarine to cut down on fat)

Preheat oven to 375 degrees. Place cut apples in an ungreased dish (you can use round, oblong or square). Sprinkle with cinnamon, water and lemon juice. Toss to evenly coat apples. In a separate bowl, combine all topping ingredients until crumbly and then spoon evenly over apples. Bake for 25 to 35 minutes until golden brown. Serve with vanilla ice cream!

Wednesday, June 16, 2010

Lemonade Cupcakes


Summer is here and the drink that seems the most refreshing during this season is lemonade. For a dear friend's birthday, I offered to bring the cake. Since it was going to be an outdoor picnic-style dinner, I figured that cupcakes would be easier to eat than a normal cake. And what could possibly be a better way to welcome summer and celebrate a birthday than with lemonade cupcakes?!

I was originally planning on doing a simple, lemon cream cheese frosting...


But after talking to a few people, I decided to do a strawberry frosting as well. And after talking to one more person, I decided to try a raspberry frosting too! Was I crazy? Definitely.


So here's the recipe for the lemon cupcakes AND all 3 frostings:

Lemon Cupcakes
1 1/4 cups all-purpose flour
1/4 tsp. salt
1/2 tsp. baking powder
1/4 pound unsalted butter, at room temperature
1 cup sugar
zest of 2 lemons
2 large eggs
1/2 cup buttermilk
2 teaspoons lemon extract


Lemon Cream Cheese Frosting adapted from My Baking Addiction: (I cut everything in half because I didn't need that much frosting)
2 (8) ounce package cream cheese, softened
1 stick butter, softened
2 lbs. confectioners’ sugar
2 teaspoons vanilla extract
juice of one lemon (I used 1 teaspoon of lemon extract)

Using a mixer, blend the butter and cream cheese together until well combined. Gradually add in the confectioners’ sugar until fully incorporated. Finally mix in vanilla and lemon juice.

Raspberry/Strawberry Cream Frosting adapted from Squidoo: (Also cut in half)
1 pint raspberries or strawberries
2 pints heavy whipping cream + 4 tablespoons
1/4 cup powdered sugar

In a blender, blend berries and 4 tbls heavy cream. Set aside. Whip the rest of the heavy cream in a stand mixer until thick. Slowly add the berry mixture and the sugar until it becomes smooth.


Final product before heading out!


Thursday, June 10, 2010

Red Velvet Cupcakes


I remember the first time I tried a red velvet cupcake...I hated it. *gasp* I mean c'mon, who hates red velvet?! I thought it tasted like a bland chocolate cupcake -- poser. And if you know me, you should know that I like bold, rich flavors. Anything remotely bland makes me want to gag. Maybe that's why I love Indian food so much.

The second time I tried red velvet, I knocked off the cream cheese frosting because I hated that even more than the cupcake. *gasp x1000* Yeah, I know. How can I call myself a true baker if I don't even like the beloved cheese frosting? But this time, I actually appreciated the subtle cocoa flavor and the not-so-sweet characteristic of red velvet.

The third time was the charm. There was a catch this time because I made it from scratch. And usually, when I make things myself, I tend to like it a little more. Narcissistic maybe? Maybe.

For these cupcakes, I used the recipe from Pinch My Salt. However, I am STILL not sold on cream cheese frosting, so I've done what goes against nature...I used chocolate frosting instead. These cupcakes are really moist, fluffy, and take all the will-power in the world to only eat one. Enjoy!


Red Velvet Cupcakes

2 1/2 cups sifted cake flour
1 teaspoon baking powder
1 teaspoon salt
2 tablespoons unsweetened cocoa powder
2 oz. red food coloring (two bottles)
1/2 cup unsalted butter, softened
1 1/2 cups sugar
2 eggs, at room temperature
1 teaspoon vanilla extract
1 cup buttermilk, at room temperature
1 teaspoon white vinegar
1 teaspoon baking soda

1. Preheat oven to 350 degrees. Line two 12-cup muffin tins with cupcake papers.

2. Sift together the cake flour, baking powder, and salt into a medium bowl; set aside. In a small bowl, mix food coloring and cocoa powder to form a thin paste without lumps; set aside.

3. In a large bowl, using a hand mixer or stand mixer, beat butter and sugar together until light and fluffy, about three minutes. Beat in eggs, one at a time, then beat in vanilla and the red cocoa paste, scraping down the bowl with a spatula as you go. Add one third of the flour mixture to the butter mixture, beat well, then beat in half of the buttermilk. Beat in another third of flour mixture, then second half of buttermilk. End with the last third of the flour mixture, beat until well combined, making sure to scrape down the bowl with a spatula.

4. In a small bowl, mix vinegar and baking soda. Yes, it will fizz! Add vinegar mixture to the cake batter and stir well to combine. Using an ice cream scoop, fill cupcake cups with cake batter (they should be 2/3 – 3/4 full). You may not fill all the cups, I ended up with 20 cupcakes. Place muffin tins on the middle rack of a preheated 350 degree oven. Bake for approximately 20-22 minutes, rotating pans halfway through. Cupcakes are done when a toothpick inserted in the center comes out clean.

5. Cool the cupcakes in their tins on a wire rack for 10 minutes then remove and allow to cool completely before frosting.

Friday, June 4, 2010

Chocolate Covered Strawberry....CHEESECAKE!


There was a small meltdown in my kitchen for the past 2 weeks. I thought my baking skills were starting to fail me! 3 times, yes 3, have I tried to make a SIMPLE banana bread, only to see it deflate after coming out of the oven. It was just plain weird! Then I read a comment by someone saying that their oven temperature was wayyyy off from the actual temp. *light bulb* That's it! So I went to the market, purchased an oven thermometer and realized that MY oven was 25 degrees off! 12 bananas and countless amounts of flour and sugar later, I finally created a wonderful, FULLY-COOKED banana bread. Phew~ meltdown over.

Anyways...on to my cheesecake!
I wanted to make this cheesecake the moment I laid eyes on it. This is the reason why I believe in love at first sight. (just kidding) All the things I love are jam-packed into this little baby - strawberries, chocolate, and cheesecake. After making a gigantic mess and doing two loads(?) of dishes, this cheesecake is now baked and chillin' in the fridge.

It all started with some eggs...


Chopped chocolate. 60% bittersweet chocolate to be exact.


Some strawberries for decoration.


And blueberries. How can you say no to these little guys?? You just can't.


I was a little worried because my cheesecake started cracking, but then realized that it was okay because I had chocolate ganache on top to cover all ugly-ness.


Here's the final product. I wish I could take credit for my design, but I literally copied it exactly from the person whose recipe I used. And when you try this recipe, I give you free reign to copy this decoration exactly the way I did it. :) Happy baking!


The recipe from Annie's Eats: (Gotta love a person who shares the same name!)

Ingredients:
For the strawberry puree:
10 oz. frozen organic strawberries, thawed
2 tbsp. sugar
2 tsp. freshly squeezed lemon juice

For the crust:
1½ cups crushed graham crackers
¼ cup sugar
5 tbsp. unsalted butter, melted

For the cheesecake filling:
16 oz. cream cheese, at room temperature
1 cup sugar
3 large eggs, at room temperature
1½ tsp. vanilla extract
¼ tsp. salt
12 oz. sour cream, at room temperature
2/3 cup strawberry puree

For the ganache:
4 oz. bittersweet chocolate, finely chopped
4½ oz. heavy cream
½ of 1 large egg, beaten

Directions:
To prepare the strawberry puree, set the thawed strawberries in a fine strainer set over a bowl to collect the excess juices. Press down on the berries to extract as much juice as possible. You should have about 4-6 oz. of juice. Transfer the juice to a small sauce pan over medium-high heat and simmer to reduce to about 2 oz. Mix in the sugar and stir to dissolve. Blend in the lemon juice and the reserved solids. Transfer the mixture to a blender or food processor and puree until smooth. *(To use fresh strawberries, hull and slice the berries. Toss the berries with the 2 tablespoons of sugar and set in the strainer placed over a bowl. Let sit for 1-2 hours to extract the juices. Press down on the berries to extract as much juice as possible. Transfer the juice to a small sauce pan over medium-high heat and simmer to reduce to about 2 oz. Blend in the lemon juice and the reserved solids. Transfer the mixture to a blender or food processor and puree until smooth.)

Mix together all the ingredients for the crust and press it down and 1" up the sides of the cheesecake pan. Bake in the oven at 350˚ F for 6-8 minutes until it is a nice golden brown. Take it out and let it cool on a wire rack until you're ready to fill it with the filling.

Reduce the oven temperature to 350˚ F. To make the cheesecake filling, combine the cream cheese and sugar in the bowl of a stand mixer fitted with the whisk attachment. Beat on medium-high speed for 3 minutes, until smooth. Beat in the eggs one at a time, mixing well after each addition and scraping down the sides of the bowl as needed. Blend in the vanilla and salt. Mix in the sour cream until well incorporated. Blend in the strawberry puree.

Wrap the outside of the springform pan tightly in a double layer of aluminum foil. Pour the batter into the crust. Place the springform in a larger pan with a water bath. Bake for 55 minutes.

Remove the cheesecake from the oven but maintain the oven temperature. To make the ganache, place the chocolate in a small bowl. Bring the cream to a boil in a small saucepan. Pour the hot cream over the chopped chocolate and let stand 1-2 minutes. Whisk until smooth. Whisk in the egg. Spread the ganache mixture over the still hot cheesecake, being careful not to pour it all in one place (the cheesecake is still delicate). Smooth the top with an offset spatula if necessary. Bake 12-15 minutes, until the ganache is set around the edges.

Remove from the oven and transfer to a wire cooling rack. Cover with a large bowl inverted over the top to help cool slowly. When it comes to room temperature, transfer to the refrigerator. Chill at least 8 hours before unmolding from the springform (and be sure the ganache is completely set before covering with plastic wrap). Transfer to a serving platter. Slice with a thin knife run under hot water and wiped dry between slices. Serve.